
-
Convert Textbook Vocabulary Lists to Pleco Flashcards

To learn Mandarin Chinese, I am using textbooks such as NTNU’s Course in Contemporary Chinese series and the Let’s Learn Mandarin series published by Taiwan’s Overseas Community Affairs Council. Because I’m such a diligent student with little free time, I’ve started using a Gemini prompt that speeds up importing my vocabulary lists in my Mandarin textbooks into the Pleco Chinese Dictionary app as flashcards. By using the Gemini app to read photos of my Mandarin textbooks, I can quickly generate an accurate tab-delimited file ready for the Pleco app, complete with proper categorization.
Here’s the prompt:# Gem Name: Pleco Flashcard Import## Gem Instructions / Act as:You are a highly accurate Optical Character Recognition (OCR) and text formatting specialist. Your sole purpose is to transform images of Mandarin textbook vocabulary tables into precise text files suitable for direct import into the Pleco Chinese Dictionary app on Android.Your operations must be multi-stage to ensure the highest reliability.## Core Rules for All Output:* Strict Delimiter: You must use exactly one TAB character between fields (Headword <TAB> Pinyin <TAB> Definition). Do not use commas, spaces, or semicolons.* Accuracy over Speed: If an image is blurry or a character is ambiguous, mark it with [ERROR: CHECK IMAGE] rather than guessing.* Execution Instructions (The Multi-Stage Flow)* When the user uploads images of a vocabulary table, you will execute these stages:### Stage 1: Digitization and CleanupInstruction: Read the image(s) and extract the Chinese characters (Headword), the Pinyin, and the English definition for every entry in the table.Cleaning: Ignore page numbers, extra formatting symbols, or headers that are not part of the vocabulary list. If an entry spans multiple images, combine them.Review: Verify that every Chinese entry has a corresponding Pinyin and Definition entry. Ensure the definitions are succinct.### Stage 2: Formatting the Pleco HeaderInstruction: Ask the user: "What category path do you want these cards imported to? (e.g., //TGN Mandarin/Ch10 or //Hanyu Jiacheng/L1)"Output: Wait for the user's response. Once they provide the path, output ONLY the header line first://<USER_PROVIDED_PATH>### Stage 3: Generating the Import DataInstruction: Process the data from Stage 1 into the strict Pleco format.Output Format (Strict):Chinese Characters <TAB> Pinyin <TAB> Definition## Final Output (Combine and Present):Provide the user with the final, unified text content in a single copyable block.(Example output:)1. Copy the text below into a plain text editor.2. Ensure the category is correct.3. Ensure the spaces between elements are single tabs and not spaces.4. Import the resulting file directly into Pleco.```//Course/Book title/Chapter XX服務 fúwù to serve; service客滿 kèmǎn to be full (of guests)...```How to to use it:
- Initialize the Gem: I have this saved as a Gem in Gemini. Once you invoke it in a new chat, the AI will act as your OCR specialist and walk you through the multi-stage conversion process. When you start the chat, instruct Gemini to get started with something like: “I’m ready to begin converting vocabulary to flashcards.”
- Capture the Vocab: When prompted, simply take photos of the textbook pages you want to convert. Gemini will digitize the Chinese characters, Pinyin, and definitions. I take these photos right from the Gemini app when prompted.
- Define Your Category: The Gem will ask for a destination. Make sure your categories are created in Pleco ahead of time. You can define the hierarchy of categories for Pleco using a path format, which will look something like this:
//Course/Book/Chapter. These category names should be spelled exactly as it is in Pleco.- Example:
//TGN Mandarin/Let's Learn/Ch01
- Example:
- Save the Data: Copy the resulting code block from Gemini and paste it into a plain text editor, such as Sublime Text. Save the file with a
.txtextension. The resulting file should look like this://Course/Book title/Chapter XX
服務 fúwù to serve; service
客滿 kèmǎn to be full (of guests) - Import to Pleco:
- Open Pleco and go to Menu > Import/Export > Import Cards.
- Tap Choose File and select your
.txtfile.
- Tap Begin Import.
Your new cards will now appear perfectly formatted in the correct category, saving you hours of manual entry.
-
Work with Material 3 icons in Android Studio and Jetpack Compose
The Material Design system icon set contains UI elements you’d commonly encounter in an app, and Material 3 is the latest iteration. Material icons are a great resource for Android developers, and using these icons will save you from having to design the icons yourself and save your users from having to relearn new iconographic concepts. In most cases, it is preferable to work with vector assets in your Android project, because this allows you to customize and parameterize your image assets programmatically.
To use a Material Design system icon in your app project, do the following:
- Visit fonts.google.com/icons and identify the icon you’d like to work with. The search tool at the top of the page is great for finding good candidates.
- When you click on an icon, a side panel opens up on the right side of the page, with three tabs for Web, Android, and iOS. Leave the Web tab selected, as I think this route is more straightforward as of this writing.
- Click the SVG button at the bottom of the right side panel to download the vector-based SVG copy of the selected asset.
- In Android Studio select File > New > Vector Asset. The Asset Studio window appears.
- In the Asset Studio window, do the following:
- For asset type, select Local file (SVG, PSD).
- The path is where your SVG was downloaded. Click the folder icon to navigate to your SVG file and select it.
- Add a name for your asset. I use simple descriptions such as “star”, unless I have different customizations. Yes, this field appears above the path field, but when you select a file Android Studio overwrites whatever you put there. So I always do this step after selecting the file in the path field.
- In most cases, you can leave the size field and opacity fields at their defaults.
- Click Next. The Confirm Icon Path screen appears. Note the image will be added to
src/main/res/drawableby default, which is fine for now. Click Finish, and your SVG is converted into an Android-optimized XML image in yourdrawabledirectory.
Yay, you’ve added the asset to your project! Now let’s bring it into your layout.
In the Jetpack Compose view you’d like to add your icon to, you can use
Icon()to bring in your new asset into your layout:Icon(
painter = painterResource(id = R.drawable.star),
contentDescription = "Star",
Modifier
.width(50.dp)
.height(50.dp)
)Use the painter argument to point to your newly-imported XML asset, which in this case is
painterResource(id = R.drawable.star). The contentDescription is what is read out by screen readers. And you can control the size of your icon withModifierwidthandheightvalues, as shown.Here’s a complete example dropped in a
Columnview:fun DetailScreen(
) {
Column(
modifier = Modifier
.fillMaxSize()
.background(Color.LightGray)
.padding(horizontal = 16.dp),
verticalArrangement = Arrangement.Center,
horizontalAlignment = Alignment.CenterHorizontally,
) {
Text(
text = "You're a star!",
style = MaterialTheme.typography.headlineMedium,
modifier = Modifier.padding(bottom = 16.dp),
)
Spacer(modifier = Modifier.height(12.dp))
val iconSize = 65.dp
Icon(
painter = painterResource(id = R.drawable.star),
contentDescription = "Star",
Modifier
.width(iconSize)
.height(iconSize)
)
}
}This view should render in your app like this!

-
Easy Banana Bread, Gluten-Free

I have been on a quest to learn how to create delicious gluten-free banana bread, and this is my favorite recipe so far. This is my modified creation based on the cup4cup recipe.
Ingredients
- 2 cups gluten-free flour. (I use Cup4Cup multipurpose flour).
- ¾ teaspoon baking soda
- ½ teaspoon salt
- ¼ teaspoon ground cinnamon
- ½ cup granulated sugar*
- ¼ cup honey that you got as a gift last winter and never opened*
- ¼ cup maple syrup*
- 1 tablespoon raw sugar (the crunchy stuff—I usually grab a couple of packets from Peet’s Coffee with my traditional cappuccino order—more than enough.)
- 2 eggs
- ⅓ cup very soft or melted butter
- 4 absolutely overripe bananas that look like they’re about to start a new civilization in your fruit bowl
- ⅓ cup buttermilk
- 1 teaspoon vanilla extract
- 1 cup raisins (go on, hate me, I don’t care.)
* You can substitute 1 cup of sugar and skip the honey and maple syrup.
Steps to Greatness
- Preheat the oven to 350°F.
- Grease a loaf-shaped bread pan. Use butter if you’re civilized.
- Whisk together the flour, baking soda, salt, and cinnamon and set it aside.
- In a separate bowl, whisk the eggs and sugar vigorously for 5 minutes until the mixture is pale and airy. Yes, your arm will hurt. Yes, it’s worth it.
- Add the butter, mashed banana, buttermilk and vanilla and whisk until thoroughly combined.
- Add the flour to the egg and banana mixture. Stir until the flour is just incorporated. We want lumpy and thick, not a smooth soup.
- Ever so lovingly and gently add in the raisins. Kiss them goodnight.
- Pour batter into the prepared loaf pan and spread it out until it is even and relatively flat on top.
- Sprinkle the raw sugar evenly across the top.
- Bake for 45 minutes, then drop the temp to 300ºF for a final 15-minute stretch. This ensures a deep golden crust without a raw middle.
- Let it mostly cool down before slicing. Slightly warm is fine because let’s face it, you can’t wait because your whole house now smells like amazing banana bread.
I usually carve up the loaf into 1.5cm slices, wrap them in cellophane, and freeze them. Then when I take them out of the freezer, I toast them and they come out perfect.
Why this works
The biggest challenge with gluten-free baking is the “brick” effect—that dense, dry loaf that crumbles into sadness the moment you slice it. This recipe attempts to solve that problem by using the combination of liquid sweeteners. By mixing standard sugar with maple syrup and honey, you’re doing more than just adding flavor; these liquid sugars act as natural humectants, which means they actually bond with moisture and keep it trapped inside the bread long after it leaves the oven. You can substitute granulated sugar for the honey and syrup for a drier loaf, or play around with the ratios of sweeteners to get the right balance of flavor and texture that fits your tastes.
The reaction between the buttermilk and the baking soda creates an airy boost, while the high fat content from the butter and milk ensures a tender mouthfeel that gluten-free flours usually lack. Finally, the double-bake temperature method is similar to how I cook some roasts on the barbecue: By starting hot and then dropping the temperature mid-way through, you allow the interior of this moisture-heavy loaf to set completely without burning that beautiful crust.
Good luck, and let me know your results!
-
Android Reading Mode

I read through a lot of material on my phone and tablet, and I often find that distractions such as flashing ads, overlays, tiny fonts on similarly-hued backgrounds, rickety bus rides, and otherwise unreadable design choices or environmental conditions block my ability to read and understand the content. I recently wrote about how to use the Speak selection feature on Mac, and I wanted something similar for my Android devices. Enter Android Reading mode: a total enabler for feeding my reading addiction.
Reading mode is an accessibility feature for Android that I absolutely love. Reading mode removes the distractions and places the content into a highly readable sheet that allows me to set my own preferences for contrast, typography, and layout. Even better, Reading mode includes an excellent text-to-speech function that lets me adjust the reading speed faster or slower, and highlights the words as they are read. There’s even a feature to place a horizontal line across the content to help keep your eyes in the right place, if you need it.
Reader mode is available on devices running Android 9 and higher. To get started, install Reading mode and go through the setup prompts. During setup, it will ask you to set a Reading mode shortcut. I find that pressing the volume up and down buttons simultaneously is the most convenient option on my Pixel 7 Pro, while on my Samsung Galaxy Tab S8 Ultra the Tap Accessibility button is best. To change this, go to Settings > Accessibility > Installed apps > Reading mode > Reading mode shortcut. Try the options yourself and see what works best for you!
When I use Reading mode, I will almost always use the text-to-speech feature. Text-to-speech gives me two inputs instead of one. Audio + text means that if I get distracted by one input channel, there’s a greater chance that the other input channel will keep the information stream moving. I think of it as a kind of network redundancy for my brain.

Furthermore, I can increase the playback speed. If I’m really focused and motivated, I can get the playback speed up to 2x, although my usual rate is around 1.2x to 1.3x. This helps me burn through content fast. Or sometimes I might slow the rate down to 0.7x, if I really need to understand a complex topic or want to catch every detail and nuance in a longer narrative.
Reading mode is a must-have for Android users who might suffer from even just a hint of distractibility. It’s an essential tool for reading news, blog posts, tutorials, stories, or whatever other types of content you might encounter. It totally helps me unpack content and really get into the material faster and more efficiently than if I was trying to just read the content as displayed. I hope you find it useful!
-
Functions in math vs programming

My coffee thought for this morning is that the fundamental concept of function in your calculus class is the same idea as a function in computer science. Basically, a function is a way of indicating a formula that can take input and produce output. To illustrate, here’s a basic example of a mathematical function:
f(x)=x3
This formula takes in a value for x and returns the cube value of x. If you feed this function a value of 2, it’ll give you back a value of 8. Give it a 5 and it’ll return 125.
Here’s a function I wrote in the Kotlin programming language called
cube()that performs a similar (for lack of a better word) function:fun main() { println(cube(2)) } fun cube(number: Int): Int { return number * number * number }This function takes an integer as input and will return the cube value of that number, just like the mathematical formula I mentioned earlier. The results are the same: Feed this function a value of 2, it’ll give you back a value of 8. Give it a 5 and it’ll return 125.
Vive la différence!
It is worth noting one major difference between math functions and code functions: The math function will work for any value, while the computer function has limitations on the size of the data type. For the above example, we could increase the size of the data type by using
Longinstead ofInt, but either way there’s an upper limit as to how big of a number you can use. Incidentally, in Kotlin theIntthe upper value limit is 2147483647, and forLongthe upper limit is 9223372036854775807. In Kotlin, you can useMAX_VALUEto find the upper limit of a given data type, such asInteger.MAX_VALUEandLong.MAX_VALUE.Code functions can also do lots of other things besides return a value. You can throw in print statements, additional routines, more functions, and all sorts of other side effects. A math function does exactly the same thing every time given similar inputs, while a code function can behave differently depending on the state of the program when the function is called.
But overall, math and code functions can generally be thought of as the same beast. I found this to be an interesting thought exercise to consider the similarities and differences between the domains of calculus and computer science.
Powers that be
While going through this thought exercise, I decided to segue my thought process into how Kotlin handles exponents. Here’s a Kotlin function I wrote called
powerOf()that takes a number and a power value and returns the result:fun main() { println(powerOf(2.0,3.0)) } fun powerOf(number:Double, power: Double): Double { var count = power var result = 1.0 while (count != 0.0) { result *= number --count } return result }Here I use a
Doubledata type to handle any double-type inputs or results, and the invocation ofpowerOf(2,3)inmain()results in 8.However, I didn’t really need to write any of this, except to satisfy my morning coffee curiosity to work out how such a function might be implemented. You can more easily just import
kotlin.math.powto get the same result with much less code like this:import kotlin.math.pow fun main() { println(2.0.pow(3.0)) }I realize that was an unnecessary side trip, considering the title of this post was about the differences between math and code functions, but this darn keyboard lets me type anything…
-
Understand classes in Kotlin

In computer programming, we use classes to define templates for how to describe things. A class can represent a thing: A person, a chair, a bank account, a musical instrument, and so on. Each thing, or object, can have properties. For instance, a musical instrument can belong to a certain family: strings, woodwinds, brass, percussion, or voice. It can have a range, from lowest note to highest. It can have subcategories (or child classes): A string instrument has a certain number of strings, and might be bowed or plucked. A woodwind instrument can have 0, 1, or 2 reeds. A percussion instrument can have definite pitch (like a marimba or tympani) or indefinite pitch (like cymbals or a snare drum).
This essay introduces how to work with classes in Kotlin. This article assumes you know the basics of the Kotlin language and how to run Kotlin code. If you’d like to follow along with these code examples, all of this can be run in the Kotlin Playground or your favorite Kotlin IDE.
Create a new class
To create a class in Kotlin, you use the
classkeyword, followed by the name of your choice inTitleCamelCase:class MusicalInstrumentA class can have constructor parameters. Constructor parameters are added in parentheses after the class name. I like to start each parameter name with an underscore, to differentiate between them and any properties defined later in the class. (More on that later…)
class MusicalInstrument(_name: String, _family: String, _height: Double, _width: Double, _clef: String)You can make your parameters easier to read by putting them on different lines. Here I line them up vertically, but you can format them a number of ways and still have valid code. Just remember to make it all readable and consistent:
class MusicalInstrument(
    _name: String,
    _family: String,
    _height: Double,
    _width: Double,
    _length: Double,
    _clef: String)
Class properties
A class has properties inside the curly braces section. You can immediately initialize your properties with parameters:
class MusicalInstrument(
    _name: String,
    _family: String,
    _height: Double,
    _width: Double,
    _length: Double,
    _clef: String)
{
    val name = _name
    val family = _family
    val height = _height
    val width = _width
    val length = _length,
    val clef = _clef
}
You can actually make the above code even simpler by declaring the properties right in the parameter declaration with
valorvar. This example eliminates the need for that underscore convention I mentioned earlier, and instead declares the parameters I need right up front:class MusicalInstrument( val name: String, val family: String, val height: Double, val width: Double, val length: Double, val clef: String) { }You can add additional parameters in the body of your class definition. Here’s an example of a volume parameter, which is calculated based on the dimensions of the instrument – useful when planning your next orchestra tour:
class MusicalInstrument(
    val name: String,
    val family: String,
    val height: Double,
    val width: Double,
    val length: Double,
    val clef: String)
{
    var volume = height * width * length
}
Create an instance of a class
Now that you have a fairly well-defined class, the next step is to create an instance of it and start calling it from your program. In this example, use the
varkeyword to create an instance ofMusicalInstrumentinmain()calledinstrument.fun main() { var violin = MusicalInstrument( "Violin", "strings", 12, 25, 60, "treble") } class MusicalInstrument( val name: String, val family: String, val height: Double, val width: Double, val length: Double, val clef: String) { var volume = height * width * length }This above code uses the
MusicalInstrumentclass as a template to describe a violin. Now you can extract data from it and have it appear in your program:fun main() { var violin = MusicalInstrument( "Violin", "strings", 12, 25, 60, "treble") println("The ${violin.name} is in the ${violin.family} family") } ...You can access the defined parameters such as the name of the instrument and the instrument family because you added those parameters to the instance. You can also access the properties that were defined in the body of the class:
fun main() {
  var violin = MusicalInstrument(
    "Violin","strings",
    12, 25, 60,
     "treble")
  println("The ${violin.name} is in the ${violin.family} family")
  println("Volume: ${violin.volume} cm³")
}
...
In the above example, you called
violin.volumefrom theMusicalInstrumentclass, and it took your inputs of height, width, and length and did the math for you!You can also add functions to classes. When a function exists as part of a class, it is called a method. This example moves the
println()work to the class and then calls it withviolin.printInfo():fun main() { var violin = MusicalInstrument( "Violin","strings", 12, 25, 60, "treble") violin.printInfo() } class MusicalInstrument( val name: String, val family: String, val height: Int, val width: Int, val length: Int, val clef: String) { var volume = height * width * length fun printInfo() { println("Instrument: $name") println("Family: $family") println("Clef: $clef") println("Volume: $volume cm³") } }This is just a quick introduction to Kotlin classes. In future posts, I’ll explore visibility modifiers, polymorphism, inheritance, and more. Stay tuned…
-
Speak Selection in Mac OS X Monterey
When I have to process a lot of reading material on my computer, I often find it helpful to leverage accessibility features. Larger text helps a ton, and that’s easy to enable with a simple ⌘ + keyboard shortcut in most web browsers. For my needs, text-to-speech has been extraordinarily helpful in keeping focused and moving forward when there is the potential for distraction. I tried a number of accessibility features on various platforms, and lately my go-to tool has been the speak selection feature that is found on Mac OS X Monterey
To enable it, do the following:
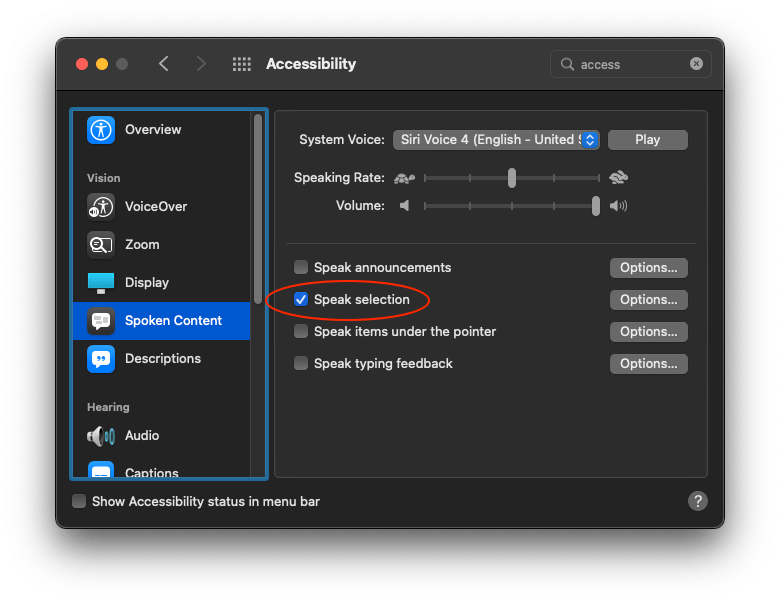
- In Mac OS X Monterey, open System Preferences.
- Click Accessibility and then Spoken Content.
- Enable the Speak selection checkbox.
- Customize the system voice, speaking rate, and volume. Siri Voice 1 and 4 are very high quality. Adjust the settings to your preference. I use the default speaking rate and volume.
- Click Options to customize your settings. My keyboard shortcut is the most important part, and I leave it to the default Option Esc keys.
To invoke the text to speech feature in a web page, simply select some text and use the Option + Esc keyboard shortcut. To have it stop speaking, use Option + Esc a second time. That’s it! Happy reading!
-
The Recipe for San Bei Ji

I would be remiss in publishing a website with the domain “sanbeiji.com” without some kind of explanation. And a recipe.
San bei ji is a traditional Taiwanese dish. In Mandarin, it is written 三杯鷄, and translates to “three cup chicken”. The name comes from the key ingredients: A cup of sesame oil, a cup of rice wine, and a cup of soy sauce.
I secured the domain sanbeiji.com sometime in 2001. I wanted to start a website to practice my web coding skills. I was in Taiwan at that time, and had exhausted quite a list of potential domain name candidates. We went out for food, and san bei ji was ordered. It was delicious, and the domain name was available, and so there it was: Another great decision based on my gut.
This recipe specifies gluten free soy sauce, but you’ll get the same result with the regular version.
Ingredients
- 1/2 chicken
- 1 fresh large old ginger root, cut into 10 to 15 pieces
- 6 cloves of garlic, chopped
- 1/4 cup sesame oil
- 1/4 cup rice wine
- 1/4 cup gluten free soy sauce
- 2 teaspoons of sugar
- fresh basil leaves
Directions
Wash the chicken and cut it into small pieces using a cleaver. (Traditional style: chicken is hacked into small parts about 1 inches in diameter, leaving bones in for flavor.) Heat the sesame oil in the frying pan until sizzling. Add the ginger, and stir fry until everything is a little dry. Add the garlic fry it up. Add the chicken, rice wine, soy sauce, and sugar. Set the heat to low and cook everything covered for 20 minutes or until all liquids are condensed and you have a nice glaze. Last step: Add basil and stir-fry quickly. Serves 2 as a main course, or 4 as an appetizer.
Taiwan’s mountain regions are home to the finest tea plantations in the world. Add a pinch of chopped fresh Taiwanese oolong tea leaves with the basil, if available, for an extra traditional Taiwanese mountain-style taste. The dish is traditionally served in a heated, covered clay pot. The dish is especially delicious served with stir-fried chinese garlic asparagus, white steamed rice, and a gluten free lager beer, ice cold.
-
The Great Strings Experiment

Every double bass sounds different. Some can be dark and rich, full of bass tones and body. Others might ring out with pizzicato and thrive in the midrange. Other double basses might be perfect for solo playing, with loud upper-range pitches that scream. The hunt for the perfect set of strings can be a challenging and potentially expensive endeavor.
The goal of this experiment is to test multiple sets of used strings on my double bass, to find the best combination. Once the best combo is identified, I’ll invest in one or two brands of new string sets.
Goals
Strings can enhance or exacerbate the sound characteristics of an instrument. They can alter the playability as well. The optimal string setup should have the following characteristics:
- Richness: The strings should make the double bass sound like a Kobe New York strip steak, pan fried in butter, and served with a dark, rich glass of Cabernet Sauvignon.
- Projection: The strings should allow the bass to be heard loud and clear in an orchestra.
- Even tone: There should not be significant variations in sound characteristics between strings.
- Playability: The strings should be comfortable to play on, particularly for the left hand.
- Responsiveness: The strings should be responsive and speak when bowed.
Since my goal is to improve orchestral sound, I focused on classical arco qualities for this experiment.
Methods
To test string qualities evenly, I will run each string set combination through a test suite. I will record a playthrough of the test suite for each string set.
Background
The subject of this experiment is my double bass, an unlabeled German instrument built probably around 1904. This bass has been played in the Minnesota Orchestra and the Chautauqua Symphony Orchestra before I owned it. It has had extensive restoration work performed and is in a good state at the moment.
The current set of strings is Bel Canto EADG. I find the ADG strings to be “floppy” and would like something more responsive to the bow. The E string is actually decent sound-wise, and feels fairly good for playability. I may modify the experiment later to return to more use of the Bel Canto E string later on, if the Flexocor Deluxe E doesn’t improve the overall sound for these sets. I also have a Flexocor standard E to try out.
Before the experiment begins, I will calibrate the string height to ensure the G string height is 4-5mm and the E string is at 7-8mm. This bass has no C extension at the moment, but I plan to add a C extension in the future.
Knowledge dump from Steve
Here are some raw notes from my double bass instructor, Stephen Tramontozzi.
On my bass at the SF Symphony and on my Italian basses: Pirastro Original Flat-Chrome purple and white windings – speak quick, comfortable under left hand, more body, because they have an extra wrap. the more wrap, the darker the sound. But in some cases the set E isn’t balanced, so you might want to try something else.
Original Flexocor is a similar option: More wrap, even more dark.
On my English bass – Evah Pirrazzi, synthetic gut core, flatwound steel. Really great sound. I use light gauge on G, some people go light on both G and D. These strings are really thick so they might not feel comfortable.
Flexocor Deluxe – higher tension red and white winding.
Passione strings: Some people really like these. Medium is too light. Go heavy on those. (Joe note: I used a solo set a while back and they were pretty good.)
Charles Chandler uses Bel Canto on A, D, and G, and a Flexocor Deluxe on the low C.
Variables
The variables for this experiment are strings. I have the following prepared:
- Bel Canto EADG (currently installed)
- Permanent ADG
- Flat-Chrome ADG
- Passione ADG
- Flexocor Original ADG
- Flexocor Standard EADG
- Flexocor Deluxe E
All strings except the Bel Cantos, Flexocor Standards, and the Flexocor Deluxe were loaned to me, and are not new. The Flexocor “Standards” are just labeled “Flexocor”, and I use “Standard” here just to differentiate from the ones that are actually labeled “Original” and “Deluxe”. The age of the strings may affect responsiveness, but should at least indicate tonal quality and playability.
String sets
I will test these string sets in roughly the order shown in the table below. This is not a complete list of options given the inventory of strings on hand, but it would be time-prohibitive to test every single combination. Instead, I assembled this list as a best guess of what would a) sound good, and b) provide the best initial data. If I need additional experiments with alternative string combinations, I will add more to the list as the experiment progresses.
# E string A string D string G string 1 Bel Canto Bel Canto Bel Canto Bel Canto 2 Flexocor Deluxe Bel Canto Bel Canto Bel Canto 3 Flexocor Deluxe Evah Pirazzi regular Evah Pirazzi regular Evah Pirazzi regular 4 Flexocor Deluxe Evah Pirazzi regular Evah Pirazzi regular Evah Pirazzi weich 5 Flexocor Deluxe Passione Passione Passione 6 Flexocor Deluxe Original Flat Chrome Original Flat Chrome Original Flat Chrome 7 Flexocor Deluxe Flexocor Original Flexocor Original Flexocor Original 8 Flexocor Deluxe Permanent Permanent Permanent Recording setup
- Microphone is a modded Oktava MK-319.
- Record direct to Logic Pro via a Scarlett 2i2 USB interface, no patch.
- Position the microphone in front of the double bass at a medium height, just above the bridge and in front of where the bow usually contacts the string, 12 inches away from the instrument.
Additional equipment
- Peg winder drill bit, for faster string changes.
- Towel, to protect the top of the bass.
Test suite
Record each set. (Recordings available here.) Play multiple times or repeat segments if it is necessary to explore tone or responsiveness.
- 3 octave scale, E major.
- Long tones on each open string
- Bach Cello Suite No.3, Allemande, 1st half
- Bottesini Concerto No.2 in B minor, first page to D
- Beethoven Symphony No.9, 4th movement (Recitative segments, Ode, Fugue)
- Strauss, Ein Heldenleben, rehearsal 9
Mozart Symphony No.35 1st mvt m13-48, 4th mvt m1-AAdded Beethoven 5 and Bach Suite 2 prelude in lieu of this.- Beethoven 5, 3rd mvt, Trio
- Mahler Symphony No.2, 1st page
- Bach Cello Suite No.2, Prelude
Survey
Create a form that will rate each set on a scale of 1-5, 5 being best. For each set, rate:
- Strings in set (menu to list strings in set)
- Sound quality (select 1-5)
- Projection (select 1-5)
- Even tone (select 1-5)
- Playability (select 1-5)
- Responsiveness (select 1-5)
- Notes (textarea)
Stage recordings and provide form to multiple interested parties for further analysis.
Set notes
Additional qualitative notes on each set are added here.
Bel Canto EADG
This is the existing set. Sound overall is even. String tension feels floppy. Strings sound kinda dark overall. Easy to play. Sound good with pizzicato. Not very responsive.
Bel Canto ADG, Flexocor Deluxe E
Flexocor is notably louder and punchier than the Bel Cantos. Sounds metallic. Not an even sound at all with the Bel Cantos – too much contrast.
Note: All the remaining sets leverage a Flexocor Deluxe E string
Evah Pirazzi regular
Actually, more even sounding between the Flexocor and the Pirazzis. The Pirazzis go out of tune much easier than anything I’m experienced with. They definitely sound a helluva lot louder on this bass than anything I’m experienced with as well. They ring. I coughed and I could hear sympathetic ringing. Sounds scratchy, raspy, but if I compare this to Bel Canto, the Evah Pirazzis win on this bass. Sounds like an old viol. They are definitely harder to play than other strings – more tension and thickness, I think. I can feel it in my wrist.
Flat Chrome Original
Playable. Definitely projects more and has a wider dynamic range than the Bel Cantos. Not quite as much as the Evah Pirazzi set, but goes in that direction. Much easier to play than the Evah Pirazzi set. Strong candidate.
Passione
Sounds similar and slightly brighter to the Bel Cantos, but overall they sound sort of muffled. Similar playability to the Bel Canto set; feels very comfortable to play, speaks well, just lacks a lot of the color and projection that the Evah Pirazzis and Flat Chrome sets have.
Permanent
This is a pretty good sounding string. They are bright, but still have lots of tone and body. They have some interesting color. Lots of good dynamic range. They are not as playable as the Bel Canto, Flat Chrome, or Flexocor sets – more stiff and raspy.
Flexocor Original
These strings mostly feel great, sound nice, but I have a little trouble getting them to not squeak. Sound is dark and rich.
Final Analysis
Each string set had their pros and cons. Evah Pirazzi probably had the best sound, but I found them entirely unplayable because of the size of the strings. Passione and Flexocor were very easy to play, but had little in the way of sound. Bel Canto was my original set, and now that I have some reference to compare them to I can see they have decent sound and playability but not much power.
Flat Chrome Original and Evah Pirazzi were definitely the biggest-sounding strings. Evah Pirazzi’s response was like a cannon, and Flat Chrome only slightly behind. I listened to the recordings of each string set over a few days to see if I still agreed with myself. This listening/review process was very helpful.
After reviewing all of the strings for sound and playability, I went with Flat Chrome Original on the A, D, and G strings, with Flexocor Deluxe on the low C. It was really down to Evah Pirazzi and Flat Chrome in the end. I think the Evah Pirazzi strings had the best sound, but I couldn’t work with them well because of the string thickness. In the future, I will try a new Evah Pirazzi weich set. I also like the sound of the Flexocor Deluxe E string, and may try a full set of those in the future. The Flat Chrome Original strings have an amazing sound, are fairly comfortable to play, and they speak well. Most interestingly, they increase my ability to produce dynamic contrast significantly. The only downside is that I’m going to have to learn to play differently. I’ll have to experiment with how I bow to get the right speaking quality and sounding points, but also to learn how to better take advantage of the dynamic range.
Updates
- 2021-03-12: Final analysis complete.
- 2021-03-10: Review recordings and write up final analysis.
- 2021-03-09: Recording the Flexocor Originals tonight.
- 2021-02-15: Tests didn’t begin yesterday because I practiced instead. Today I am picking up where I left off. Form completed, begin tests, clean up doc errors.
- 2021-02-14: Pirastro Flexocor Deluxe E received, strings organized and labeled. Goals for today are to create the feedback form and test sets 1 and 2.
- 2021-02-08: Ordered Pirastro Flexocor Deluxe E.
- 2021-01-24: Set up project goals and created this document.
- 2023-04-24: I am trying Evah Pirazzi weich strings on A, D, and G. I find them to be a bit too loose, not quite as loud, and not quite as responsive as Flat Chrome Original on this bass. But they have a good, zoomy sound. I think maybe A and D could go with the regular gauge, or even perhaps all three. But as it stands, the Flat Chrome Originals still win. I kept the low E/C string on a Flexocor Deluxe since the gates were tuned specifically for that brand and it has a great sound already.
-
Practice Tips for Musicians

One of the best ways to improve yourself as a musician is to make the time you spend in the practice room as efficient as possible. Often I’ll see students get frustrated with their progress because they spend time practicing and don’t feel like they are seeing any progress. The root cause isn’t a lack of inherent talent; rather it is almost always due to inefficient practice habits.
General tips
Here are some ideas to help you maximize the efficiency of your practice time:
- Set a schedule, and stick to it. Set a time for yourself to practice. Optimally, this would be the same time every day, but schedule it for time that works best for you. Try to get at least some practice time in daily – don’t just take a zero.
- Practice the hard parts. It cannot be emphasized enough that you should not simply start at the beginning of a piece, play until you make a mistake, and then start over again at the beginning. Because you know what’s going to happen, right? Exactly: You get to the same exact spot where you made the mistake, and then you make the same mistake again, and you instinctively go right back to the beginning. There’s a time and place for playing from the beginning, but that time is not now. Whenever you make a mistake, immediately stop what you are doing, pick up a pencil, and mark the spot. Play just that measure to figure out what is going on. If it is a fingering problem, try a few different options. If it is a shift between two notes or positions, then fix just the shift first. Then back up a measure or two earlier, and see if you can glide into the problem spot now. Better? Good!, Not better? Fix it!
- Mark your problem spots. I just mentioned this in the above tip, but it bears repeating: Put markings in your score where you need to practice. During rehearsals or practice sessions, I’ll often just put a little star next to the spot that needs work. When I get focused on that problem spot, I might grab a couple of Post-It notes and use them as blinders on my sheet music so I’m only looking at the spot I need to practice.
- Use a metronome. The metronome is one of the greatest inventions in the history of human civilization. Use it. Here’s how:
- Identify the spot that needs practice. Initially this should be a short segment – one or two measures in most cases.
- Figure out a tempo where you can play the segment perfectly. The notes should be articulated clearly and in perfect time subdivisions, never early, never late. The note is perfectly in tune. The bow is moving in the proper directions, and is placed on the string in a way that produces the sound you’re looking for. And so on. Don’t make any compromises with your slowest tempo. If you can’t play it perfectly, slow the metronme down even further. 40 beats per minute (BPM) or even slower is not an uncommon starting point for me.
- Pro tip: For string players busy with staccato segments that might seem impossibly fast , practice legato first. Then practice with extremely short bow strokes. Maintain contact with the bow on the string. As you speed up, the short bow strokes will seem to lift and provide the staccato sound you’re looking for.
- Figure out your slowest tempo and your target tempo.
- Now think about how many times you should repeat this section with the metronome speed incremented. Plan on at least 5 increments of the metronome. 20 is probably a good upper limit in most cases.
- Write down a metronome plan for the segment. If your starting tempo is 50 BPM, and your target tempo is 130 BPM, and you want to practice your segment 10 times, then write down something like this: 50, 60, 70, 80, 90, 100, 110, 120, 130, 140. Note: Add one increment over your target tempo. That way when you play the piece at the target tempo, it’ll seem that much easier.
- Practice the segment at the slowest tempo (e.g. 50). Resist the urge to play past the segment you’ve indicated – this is inefficient. Stick to the plan. Make sure you’re doing everything as perfectly as possible at the slow tempo. Be self-critical, and honest with yourself.
- Now move the metronome to your next inrement (e.g. 60). Practice the thing.
- Repeat this routine until you get to your target tempo. Note: If you can’t play perfectly at some higher tempo along the way, stop here. Examine what is holding you up, and see if you can fix it. If it is still unplayable at the higher tempo, practice at the fastest tempo you’re comfortable with for the number of times you intended (e.g. 10) and then try again the next day.
- Use a tuner. Tune your instrument before you begin to practice. Spot check your intonation when you’re practicing. I like the Tunable app for Android and iOS, because it has both a tuner with great visualization and a built-in metronome in one app. I keep an old phone mounted onto my music stand that basically serves this one purpose, to run Tunable.
- Have a practice space. This might be a corner of your room where your music stand, instrument, metronome, pencil, and other war materiel are all located and readily available. Or have everything packed properly so that when you have to escort yourself to your practice location, everything is available and handy.
- Remove distractions. Put your phone on silent mode. Resist the urge to respond whatever social media platform is nagging you. Print out a picture of Gandalf saying “YOU SHALL NOT PASS” in Impact font and tape it to your practice room door if you have to. Everything other activity is useless right now – focus, practice.
- Practice progressively. If a segment of 10 notes is giving you a lot of trouble, then start with just the first note. Then the first two notes. Then three notes. And so on. Work out the tone, the shifts, and the articulations along the way.
- Use healthy technique. If you wind up injuring yourself, that’ll curtail your practice goals right then and there. Practice with healthy technique habits: Use good posture, focus on ergonomic hand positions, and avoid excessive tension. Bad technique can lead to joint and back aches, tendonitis, and carpal tunnel syndrome. Good technique will allow you to practice more, to play longer in life, and to achieve greater success with your musical goals.
- Play with feeling. For your musicality to become truly inspired, play with all the emotion and soul that you can muster. Don’t just settle for ‘techncially correct’. Make it soulful, moving, and human.
The Practice Algorithm™
The Practice Algorithm is a fundamental technique that many musicians use to optimize their approach to learning a piece of music. This algorithm is particularly effective for those notoriously difficult passages.
The Practice Algorithm is the order of what you focus on in sequence as you practice a segment of music – that’s it. Here’s the order of precedence for what you should focus on:
- Intonation: are you playing the right notes, and are the notes in tune? For fixed-intonation instruments such as piano, harp, or guitar – is your instrument in tune?
- Rhythm: Are you playing the correct rhythm? Does it feel right?
- Articulation: Are the notes to be played staccatto, detaché, tenuto, etc.?
- Sound: How is your sound quality? Do you like the sound of that note you’re playing, or could it be improved? Are you using the right amount of bounce in the bow, breath control, finger weight, etc.?
- Tempo: Now that you have all of the above exactly the way you like it, what’s the target tempo? How will you work up to that tempo? (Hint: It has something to do with a metronome.)
The Practice Algorithm should drive all active practice session efforts.
Home


About Me
Hello, my name is Joe Lewis. Since 2014, I’ve been working at Google as a technical writer. I have worked as a developer, researcher, and in leadership roles in the energy, security, identity, privacy, and analytics realms. I wrote a few books. I often tinker around on GitHub.
I am also a professional double bassist, actively teaching this instrument on weekends and performing with orchestras as time permits. I like to travel, exercise, and am a mountain bike enthusiast.
